Brake Maintenance
|
Rotors |
Pads |
Calipers |
| Front |
Coupe: 276 x 25mm ventilated (4 x 10⁸ bolt pattern)
Sedan: 256 x 25mm ventilated (4 x 10⁸ bolt pattern)
**NOT the same as regular 90
-- same diameter, different offset** |
Coupe: D419
Sedan:227BL |
Coupe: Girling G60 (dual-piston)
Sedan: Girling (single piston) |
| Rear |
245 x 10mm solid (4 x 10⁸ bolt pattern) |
D228 |
Girling (single piston) |
Disassembly:
-
Jack up car, place jack stands under chassis
-
Remove the wheels
-
Using open ended wrench to hold guide head pin, remove the bolts which hold
the caliper to the mounting bracket
-
Remove the caliper then remove the pads
-
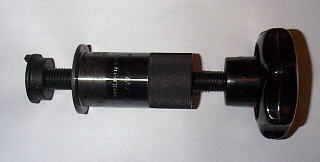
Remove some brake fluid from the reservoir then use a big c-clamp to
push the pistons back into the caliper. Be careful not to damage any rubber
parts. For the rear brakes, the piston has to be screwed back in. The
Bentley manual says that a hex key is used,
but most (all?) seem to require a special tool that has two small projections
to mate with two indentions on the piston. The official Audi tool is pictured
below left, but it is expensive (~$85 from Zelenda tools, 1-888-892-8348).
An equivalent tool designed to be used with a ratchet is available at
most auto parts places for $10 to $15. A common one is called a Disc Brake
Piston Tool (P/N 28600) made by
Lisle, (28300 & 25110 are obsolete
Lisle P/Ns that should also work if you find them on the shelf). A similar
cube tool is available from
KD tools (P/N
3163 pictured below right). These little cubes have various fittings on each
face for different cars. The only disadvantage to using a cube tool is that
you have to simultaneously apply inward pressure on the piston as you turn
it while the official tool does both for you when you turn the knob.
Official Tool
 |
Lisle 28600, 28300, or 25110
  |
KD Tools 3163
 |
-
If you're replacing the rotors, or turning them, remove the caliper mounting
bracket so that the rotors will come off.
-
Replace any rubber parts that look doubtful
Reassembly:
-
Place rotor back onto hub. (You can use a spare M14x1.5 bolt to hold the
rotor in place.)
-
Bolt caliper mounting bracket back onto hub, using locktite or new bolts.
-
Place new pads into caliper with the blue antisqueal gook between the pad
and the caliper to prevent squeal. This will prevent the brakes from squealing,
maybe. A whole bunch of RTV supposedly works better. You want to really deaden
that vibration mode and too much doesn't hurt.
-
Place caliper into caliper mounting bracket very carefully, so as not to
damage the rubber parts (either the old ones, or the new ones you just replaced).
-
Replace bolts which anchor caliper to bracket, with lots of grease in the
rubber slide. Make sure rubber parts are properly engaged in mounting bracket
and caliper bolts.
-
Tighten caliper mounting bracket bolts, and caliper bolts per Bentley's torque
suggestions (or just reef on them as hard as you reasonably can with a 3/8"
ratchet.) (That means "no hernias") This is the time to bleed the brakes
if that is your desire. (See below) If not, just make sure the reservoir
is full.
-
Replace wheel, wheel bolts, and torque to taste. (Don't forget to remove
the little bolt that was holding the rotor on the hub if you did that in
reassembly step #1.)
-
Remove stands, lower car, and check brakes. Test drive and bed in pads per
manufacturer's directions.
Brake Bleeding
First, you'll need some quality fluid. I don't know what the Audi OEM stuff
is, but it's fine for everyday driving. If you take your car to the track
or just generally drive it hard, here are some good quality brands that have
higher boiling points:
-
ATE Super Blue, ATE TYP 200 (amber) -- Both fluids are the same, just different
colors, so if you alternate between the two, you can tell when the new fluid
makes it to each bleed screw
-
Castrol GT-LMA
-
Pentosin DOT 4 -- This is NOT Pentosin hydraulic fluid!
-
Wilwood DOT 4
-
Cartel DOT 4
-
Ford Heavy-Duty Brake fluid (DOT 3, but apparently very good)
Cars with ABS require a specific sequence; this is:
-
Brake master cylinder, then proportioning valve
-
Right rear
-
Left rear
-
Right front
-
Left front
-
Clutch slave cylinder?? (below steering rack on top of transmission)
-
You can build a simple power bleeder with a spare brake fluid reservoir cap
and a tire valve. Drill a hole in the center of the cap just big enough for
the valve, and seal the valve on it with some RTV sealant. Drain the reservoir
with a turkey baster and refill with new fluid. Now just put the cap on and
attach a source of LOW pressure (< 15 psi) to the valve and start opening
your bleeder screws. NO more than 15psi or the seals below the reservoir
will start to leak on you, esp. if you've never replaced them. (They are
cheap, but a PITA to replace.) Make sure you keep and eye on the fluid
level in the reservoir and refill it when it gets low. If you don't keep
it filled, you'll get air in the lines, and you'll have to start all over
again.
-
If you don't bleed the master cylinder first, you will never be able to bleed
all the wheel cylinders.
-
Also, the book says if you have "height sensitive brake pressure regulator",
press regulator lever firmly towards rear axle when bleeding rear brakes.
The height proportioning valve sits on the rear trailing arm on the left
side of the car. Jack the car up, locate the valve and insert a 6mm drill
bit between the lower spring hook and the roller to fool the valve into thinking
that the car is fully loaded so it will bias the brake pressure evenly front
to rear. The valve either works or it doesn't. If it's frozen or the spring
is missing (broken) nothing happens there. It's expensive, and given what
it does, not an absolute critical item. But you should have rear brakes of
some sort, even if the valve is broken. It operates in a narrow percentage
band of rear bias, never shutting off the rear or the fronts totally.
-
Remember, NO PENTOSIN hydraulic fluid in the brake
lines! Use DOT4 BRAKE FLUID ONLY. Pentosin is found in the power steering,
the brake MC BOOSTER, and the BOMB (brake
pressure accumulator, separate from brake fluid). Brake fluid goes into the
brake MC reservoir (no need to pull screen) near center of the car; the Pentosin
reservoir is on the left fender.
See also: Brake Upgrades,
Brake & Hydraulic Problems
Back to Maintenance & Consumables
Back to 20V Home